A non-profit group, preserving Ontario's rural history one barn at a time! #SaveOntarioBarns
Wagon Door Hardware — Strap hinges and Pintles
by Claudia Smith, OBP Secretary
By the mid-1800s, Ontario farmers were increasing their grain production and three-bay English barns became common. They were typically longer than they were wide and had three more or less equal sections – a centre drive-through passage variously called the “threshing floor,” the “barn floor” or the “drive floor” that was wide enough for a team of oxen or horses and wagon and a bay or mow on each side for storing sheaves of grain, straw or a limited amount of hay.
Most of these pre-Confederation barns were built with round or squared logs. With no interior walls, they were stabilized by a three-foot high beam or “mow log” on each side of the threshing floor with one or two corresponding tie beams above them near the eave. The floor was planked with thick hickory, hemlock or tamarack planks.
Photo 1: The wide wagon doors of this basic English barn swing on strap hinges and pintles.
There was a double wagon door at each end of the threshing floor that allowed the through passage of wagonloads of sheaves and the wagon’s exit. The eave-high wagon doors were sturdily made and their efficient operation depended on their hinging. The weight of each door was supported by a pair of long, wrought iron, blacksmith-made strap hinges. The hinges had rolled ends that made a socket-like fitting that pivoted on the pin of eight-inch long, forged iron pintles fixed tightly in the door jambs.
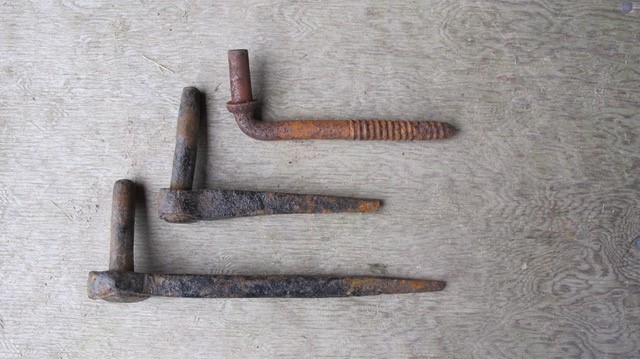
Photo 2: Three samples of pintles. Some pintles “had square shoulders that kept them from turning in the wood” with the weight of the door. They variously had a pointed end or screw-end.Photo 3: A three-foot long strap hinge and pintle at the bottom of a wagon door.Photo 4 Strap hinges were also called “lift off hinges.”Photo 5: Wide wagon doors on bank barns also swung on strap hinges. This strap hinge is on a wagon door of a barn that was raised onto a foundation which left the door unusable. Access to the threshing floor was by a gangway to the set of wagon doors on the other side of the barn. (This barn was damaged in a windstorm thus the sky visible in the photograph.)
Blacksmiths often made hinges that had decorative ends according to the individual’s trademark style or artistic bent. Some were categorized with names like “bean tipped,” “spear point” or “lollipop” strap hinges.
Photo 6: A sampling of blacksmith made strap hinges.
Before strap hinges, some 1830s-1840s wagon doors swung on different hinging connections. The following photographs illustrate the rare wagon door gudgeon-pintle hinging hardware found in Lanark County
Photo 7: An 1847 example of a gudgeon and pintle connection that once supported the weight of a door that has broken away. The gudgeon remaining in the post of the door-frame (on left) sits on the pintle in the door-jamb. Note the needle-eye like slot in the end of it. It was secured by a metal pin inserted in the slim hole in the end of it.Photo 8: Another view of the gudgeon in the door-frame.Photo 9: This gudgeon sits on a pintle in the same door-jamb as photographs 7 and 8. It was held tightly in place by a wooden washer and a slim wooden or iron peg through its needle-eye slot. When the door swung closed the washer and pinned ends of the gudgeons were inside the barn protected from the weather.Photo 10: A timber frame English barn built in 1847. Close examination will show the broken away door frame on the left and the hinging connection shown in photograph 9 at the top.Photo 11: This style of gudgeon has a threaded end and was held tightly in place with a nut.Photo 12: A exterior view of the gudgeon sitting over the pin of the pintle. This door swung open from the left.
Some very early pintles were also held in place with an iron pin through a needle-eye slot.
Photo 13: Unlike most pintles, this rare one in a mid-1830s Lanark County barn was held tightly in place in the post with a small, iron pin through a needle-eye like slot.Photo 14: Another view of a pintle held in place with an iron pin.Photo 15: The tapered end of a pintle with a wide iron pin through the slot being held tightly in place with an iron washer bent around the end of the pintle.