


Photo Documenting Barns
by Jim Campbell, Duntroon
To be clear, I am definitely no professional when it comes to photography and I welcome anyone more camera savvy to please contribute corrections and/or commentary. That said, I have (luckily!) spent a good amount of time over the past 40 years taking photos of barns as part of a documentation process that has often lead to these buildings being restored, repurposed, and/or relocated. Along the way I have found the following techniques beneficial and hope that they may be of use to you in documenting your own historic barn or someone else’s that interests you. It is valuable to understand that in too many cases all that we have left of many, if not most, historic Ontario barns are a few memories, handed-down stories, and if we are lucky enough, a photograph.

I suppose I should note here the obvious, that you should never trespass on a property or enter a barn without the owner’s consent and that a clear understanding is established of the dangers present and what the ramifications are if you or someone else is injured or worse. Lots of old barns are not necessarily very stable and instances of rotten floor beams and boards, loose braces, and other death-traps can be very common. There are many cases where strong winds have ripped off roofs, collapsed walls, or even lifted portions of a barn right off its foundation/floor. Stay away from the building and do not enter it unless there is total certainty that you and your companions are entirely safe from harm and you have the appropriate permission, understanding and agreement.

Wind-ravaged Fletcher Barn, Gibraltar, 2006. Now demolished.
In approaching a barn with a camera it can be a good idea to break the documentation task into subsets, for instance: the exterior, the byre (downstairs) interior, and the barn (upstairs) interior. If there are multiple additions or wings you may want to create further subsets. Within each of these categories consider shooting a few general overall photos but then start closing in at an increasing level of detail, with both perspective (at an angle) as well as orthogonal (“dead-on” at ninety degrees) positioning.
The Exterior:
Start off by taking some distant photos showing the context of the barn in its setting – include the residence, smaller outbuildings, tree lines, lanes, wells, etc. Views from the road often show the context well – if you have the opportunity to get up in the air with a drone, helicopter, plane or hot air balloon, go for it!

A nice collection of farm buildings, as per tradition in this area with the house forward of the agricultural buildings and addressing the road, while the barn is turned 90 degrees to capture the predominant west wind when winnowing on the threshing floor as well as work with the slope of the land for the gangway.

Barn disassembled and reconstructed as a residence near Terra Nova ON later that year. Note the significance of the barn by its location on axis with the driveway whereas the house, uncharacteristically, is ‘turning its back’ to the driveway. As we have encountered a few times, the electrical service first feeds the barn, then it returns to the house, likely an indication of which building first had electricity and a telling story of how important the barn was for a farming family in the first half of the 20th century when electricity was installed.
Take a photo from the farmhouse if it still exists, ideally with some of the farmhouse in the frame along with any of the other associated farm buildings. You could frame the view the farmers had daily as they headed out to the barn do their chores.

The barn continues to exist as shown, with its main purpose being the dominant feature of the farm’s landscape.
Then take other views as you approach the barn – again consider capturing the context of the farm buildings as a collective, possibly as would be encountered multiple times daily every time someone travelled from the house to the barn.

Take a photo of each wall (elevation) of the barn – centre yourself on the length of the wall and give yourself some distance, if available, from the building and then zoom in so that it pretty much fills the photo frame – this will minimize vertical perspective distortion compared to being close and shooting on an upward angle with a wide angle lens (the latter will cause the verticals to be … well, not vertical)
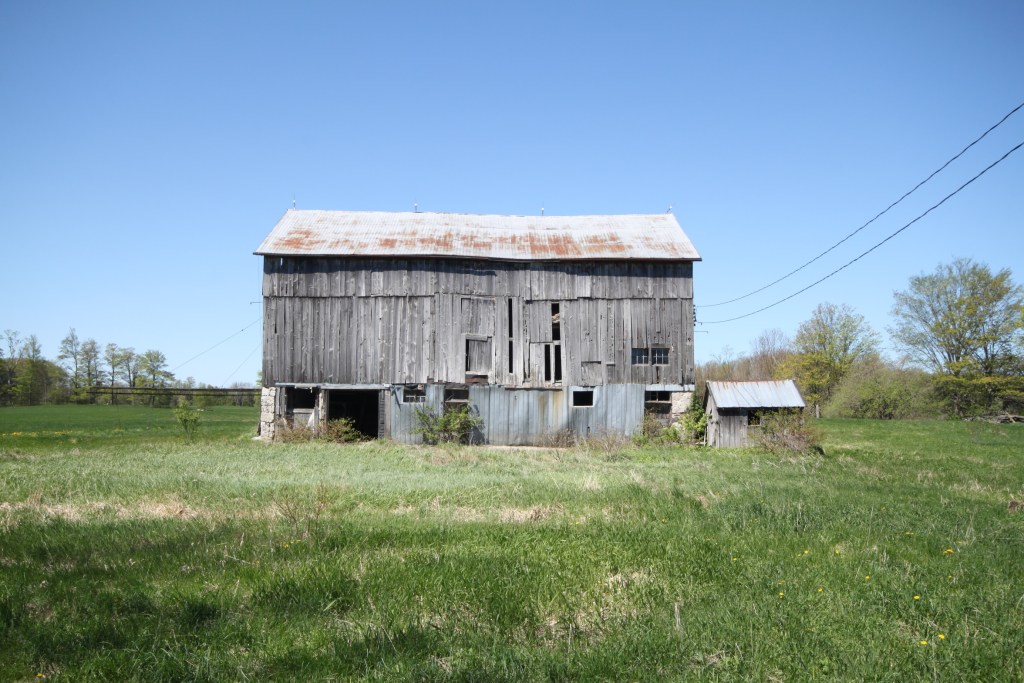
This photo would have benefited by zooming in more.
Barn disassembled and reconstructed as a residence near Terra Nova ON the following year.
Shoot a few closer perspective shots showing two or more of the barn’s walls in the same image

This barn was a liability for the owners at that time and was in serious danger of being destroyed by the forces of nature. I believe it may have been built sometime around 1870 but like other barns in the immediate area had a swing-beam frame which seems to have had become out of fashion elsewhere. I wonder if this was due to a particular framer holding on to ‘the old way’ to build, or an indication that this area still offered suitably massive timber? Or maybe the barn was older than I imagine.
Look for any funky-looking conditions and try to figure out a way to document them. For instance, very often the gangway of a bank barn has slowly pushed the central portion of the barn’s length out of line, so it can be an asset to shoot a photo looking parallel to each of the walls to show whether the wall is boxed or still straight. Another is shooting parallel to the slope of the roof so that any humps or sags in it are more apparent.


West wall bowed inward due to pressure from gangway, and east wall correspondingly bowed outward. This was a significant reason why this barn was available due to the high cost of addressing the failing foundations as well as a multitude of other technical issues. The fate of many barns in this condition unfortunately involves demolition with the sweep of a high-hoe or the strike of a match rather than the careful disassembly, repair, re-erection and re-purposing that this building was lucky to experience.
Get closer proximity or zoom in with a telephoto lens to document interesting details. You can sometimes find initials and dates carved in the foundation stones, a nicely detailed archway or the year of construction carved over the stable door, an engraved ceremonial corner stone, small low doorways for pigs, horseshoes or rings embedded in the foundation for temporarily tying up livestock, or an access door or windows on the sides of the gangway to reveal the presence of a storage room below. At one barn in our area, when inspected closely, you can discover some early settler tombstones incorporated within its foundation, and our own (long vanished) family barn’s foundation had the large lintel and associated main fireplace stones from the farm’s original 1850’s log cabin. Using a telephoto lens you may want to zoom in on any of the higher cladding details such as a year, pattern, initials or name carved into the gable boards, bracket boards at the corners of the wall where they meet the roof overhang, any ventilation features on the roof, lightning rods, etc.


The Byre Interior:
Like the exterior, consider shooting both overall (context) as well as focusing in with some dead-on photos of the principal exterior wall planes as well as any of the significant interior stalls, etc. Perspective photos are nice to have but they can read as a bit of a jumble of posts, stalls, etc. that can make it a challenge to understand what is where. Dead-on shots are usually more clear in describing what is connected to what.


Perspective photo on the right, ‘dead-on’ photo on the right.
Illustrate within your photos some of the floor structure above so that someone could later gain a sense of how many sleepers there were, what their character and form were, maybe even the wood species. I was in a 30’x60’ barn a couple of days ago where there was an interior stone partition wall (quite unusual in my experience) and three or four of the sleepers were blackened with char: it seemed a possibility that there had been an original 30’x40’ barn that burned down and when rebuilt the original foundation was restored and enlarged and a few of the salvaged sleepers were reinstalled.
Remember to document what is going on with the floor since it can tell a good story of what kind of animals were housed there, what the process was for feeding and watering them, etc.

Barn now raised, restored and repurposed for horse stabling below, feed, bedding and equipment storage above.

Pay special attention once again to any interesting details. There may be further initials carved into the stone, small low doorways for height-challenged residents, recessed shelving for ointments, tools, etc., protruding pegs for hanging horse harness, riggings for milking equipment, manger boards so weathered by the necks, tongues and teeth of the diners that they have become something more akin to sculpture than simply a well-worn stick of wood.

Also, do not hesitate to document the problems the barn is having. Photographs of the rotted bottom of a wooden supporting post or of a crumbling or bowed foundation wall can be very informative in helping understand other conditions, such as a sag in the roof or a corner of the superstructure that has dropped. Note any areas where the floor structure above appears water-damaged, and keep this location in mind when you go upstairs into the barn to determine where the roof may have leaked at one time and if there is any damage to the superstructure as a result.

This photo is not distorted. There was an incredible lean of the barnyard wall and all the interior posts as a result of the weight of the gangway pushing on the opposite wall. As well the tipping of the wall had raised the end of the floor sleepers and it would not be unusual if the centre supporting beam had dropped due to rot at the bottom of its supporting posts.
The Barn Interior:
In my mind this is the best part of the documentary job since it is pretty much always such a beautiful space to be within … despite the chances of there being piles of raccoon kaka to skirt around or the risk of encountering nest-defending bumblebees or turkey vultures. The atmosphere can be absolutely magical, with bands and rays of light streaming through the space, the sounds of the wind passing through the gaps, the never-forgotten smell of the combination of wood, straw, hay and animals. The daylighting is usually stunning to see in person, but not necessarily an easy thing to handle in a photograph (see exposure compensation in Suggestions below).

Again, take some overall perspectives, but most importantly, shoot each bent and each section of wall plane dead-on, with as little distortion as possible by backing up and zooming in, and if possible raise your camera position up in order to have less vertical perspective distortion.


Forest Barn, Rocklyn, 2005. Perspective photo of interior. Current status unknown.
On the right:
Spring Hill Farm, Glen Huron, 2008. Orthogonal photo of hay mow wall. Barn disassembled and reconstructed later that year as a residence on the same property.
If you have a drone and are a skilled “pilot”, consider using it to take some loftier overall photos but also details of anything higher up of interest, whether that be positive features or areas of concern such as rotten beams or broken rafters. A telephoto lens is a good alternative, but more limiting in terms of the viewing angle.

One of the purlin post joints showing both rot of the tenon but also the impact of the building curvature due to the gangway pressure and the dropping of the tie beam due to rotten post bottoms within the byre below. Photo taken from rougly floor level with a telephoto lens.
If you are able, willing and permitted, safely climb one of the mows if they still have a good amount of hay or straw in order to better capture the full length of the building, often not as easily comprehended from the floor level if the granary is still intact. Watch out for surprised residents.

There is a lot of telling information in this view of the barn interior. Note the far plate and purlin have dropped a considerable amount in line with the swing beam bent, and that the plate on the right, adjacent to the camera, has a notable ‘hump’. Closer inspection of the photo shows the some of the posts and long braces supporting the purlins have pulled out of their seats in at the top of the tie beams (see preceding detail photo) due to the curvature of the building caused by the push of the gangway and rotten posts bottoms below.
Ideally, position yourself dead centre at each of the gable ends, at a decent height, and shoot the full length of the barn. These photos are often very useful for documenting the inner bents and roof structure.

Also if you are able, shoot from one end of each plate (the beam that the bottom end of the rafters bear on) to the other end, this will help determine what amount of bow, whether vertical or horizontal, the frame has a result of a pushing gangway, rotten post bottoms, failing foundation, or similar.
Don’t forget to shoot upward to document the roof structure. You can shoot vertically directly below the ridge to ideally capture the full width of the barn, from plate to plate, along with the purlins and their structural supports. Another route is to position yourself against one wall and shoot upward at an angle to the opposite roof plane.

And like the basement, record anything of interest for the floor – look closely at the threshing floor in particular to see if the planks are secured by wooden dowels or nails or neither, what the nature of the wear is as a result of flailing grain or from horses, if planks have been replaced (often those nearest the door), if there is a pocket in the threshold plank at the centre of the door opening that would indicate a removable post for securing hinged doors, if the mows are floored in thick planks or the more common situation of two layers of loose-laid boards.

Plank threshing floor with mortises for undetermined purpose.
Barn disassembled and reconstructed as a residence near Terra Nova ON the following year.
Look for interesting details, and problems – again you may need a telephoto to get the ones that are higher up. Look in the sleepers above the granary for writing – it seems there are often notes or initials and dates written or carved there, maybe while someone was awaiting another load to come in from the fields or they were caught there waiting out a rainstorm. Also look for the same on the posts and beams, particularly those on either side of the threshing floor. Document any pulleys fixed to the posts or beams, the hay lifting or carrying system if there is one, or any unusual holes or brackets or grease stains on the beams either side of the threshing floor that may have been associated with missing rack-lifters.


On the left: Mid-point of the swing beam, side facing the threshing floor.
Note the initials carved long ago, and the use of a tape measure to provide scale.
A beautiful 36′ long piece of timber.
On the right: Initials marked into one of the posts of the swing beam bent, likely using a nail and hammer or an awl.
Often these bents on either side of the threshing floor were given special attention by the framer, especially those with a more artistic flare. Note if any of the columns are unusual, for instance that their depth varies along their height, or maybe the centre post has been given a special treatment.


Chamfered centre post of barn at Spring Hill Farm, Glen Huron, 2008. I have seen similar chamfered posts within historic mill buildings, I believe for instance at Black Creek Pioneer Village, and am trying to recall the intent … was it to less likely cause damage to bags or barrels of product, or was it to increase the resistance to fire? My thinking is that the chamfered post of this barn, encountered as well in a few other area barns, could very well be the framer’s embedded “signature” claiming this work as his own.
On the Right:
One of the arced, varying-depth posts supporting swing beam of the Green Barn, Epping, 2014. Interestingly the Spring Hill barn had similar posts at either end of the bent with the chamfered post (but no swing beam). Here you can see the structural advantage of the increased depth since the swing beam is secured with three, rather than two pegs which occurs throughout the remainder of the barn. Note the horseshoe, one of three nailed to the face of the swing beam, perhaps for luck … or perhaps for hanging a tool? Evidence of the post’s rotten bottom that has caused the plate above to sag is seen here with earlier repairs to the post bottom as well as the round cedar post and shims jambed in to its right.
Zoom in on any of the mortise-and-tenon joints that don’t look right – you may see that some are pulled apart, that the pointed ends of the pegs are angling to one side, that there are water stains or rot evident in seat of the joint, or that someone has made a repair by nailing on a plank, adding steel straps or tie rods, etc.


A cracked plate cause by the sustantial drop of the supporting post below, and a steel brace repairing a broken centre post in the south wall. It seems the posts in this particular location are often in poor shape on their unseen face, but you can usually tell from the exterior if there is a generous number of woodpecker holes in the cladding board that covers the post.
Survey the length of the plate with your telephoto looking for water stains and rot – the birds-mouth pockets in their topside into which the rafters are seated are an Achille’s Heel of most vintage timber frame barns since a roof leak higher up will result in water travelling down the underside of a rafter and landing in this birds-mouth joint from which it can not drain.

Roof valleys are particularly vulnerable to water infiltration, as clearly evident here where not only the plate has suffered immensely, but also the posts below. The straw barn beyond was retained in its current location and restored as a landmark building, and the rotten plate of the main barn frame was replaced and the posts repaired during the reconstruction process to create a new residence on the same property.
While looking up at the plates and the purlins, note if they are full-length, with no joints, or if there are joints – photograph those in detail to document their style and workmanship. Look too for any missing braces as evidenced by empty brace pockets or missing beams the memory of which are apparent by empty mortises or their remnants left after being sawed through. It is not uncommon to also see empty brace pockets, mortises, ladder holes, and birds-mouth seats in the most unlikely and irrational of places – these are often the outcome of recycling formerly worked timbers from a dismantled building, but can also be indicative of errors made by the framing crew, whether due to lack of experience or maybe too much Irish Dew at the lunch break ….


A few other Barn Photo Documenting Suggestions:
Utilize the exposure compensation (+/-) setting to trick the light sensor of the camera when shooting toward the sun or when snow is on the ground, otherwise what you are wishing to document is likely to be underexposed. This trick is particularly useful when inside the barn and there is daylight streaming in through the cracks, doorways, knotholes and missing boards. If you rely only on your light sensor your photo of the barn frame will likely be too dark to be useful, so try a variety of settings on the “+” side of the photo compensation to increase the camera’s exposure duration such that the timber frame is sufficiently visible; the light through the cracks etc. may now be ‘blasted out’ such that the gaps and holes appear larger and brighter, but that is a small price to pay for having a good clear photo of the barn’s timber frame.


When you are shooting a wall or bent dead-on, include a tape measure, yard stick, 12″-square panel or similar in your photos that you can later use to help you scale off things in the same plane. Make sure the stick or panel is located on the same plane that you are wishing to document.
Have people in the photo to provide a sense of scale … as well as the current fashions for mucking around in a skaggy old barn.


My wife and partner Suzanne in a wool beret and Safety Red at Spring Hill Farm in Jan. 2008.
We have a wonderful wide-angle lens (10mm equivalent) that can capture so much territory in one photo, but you need to be careful how it is utilized in order to limit distortion – best if it can be positioned and oriented as close to centre of the subject and perpendicular to it as possible.
If you don’t have a wide-angle lens, shoot a series of photos that can be ‘stitched’ together to form one larger image of the subject matter that you would have liked to have had within a single photo. Or try the panorama setting on your camera (or phone).
Increase your ISO setting for low light conditions or when you are ‘zooming’ in with a telephoto lens in order to prevent your shutter speed from being too low and the photograph suffering from ‘camera shake’.
Shoot at the highest resolution you can – the more pixels there are the more you or someone else will be able to enlarge the image or comprehend finer details.
The best weather is often a bright but cloudy day for more even light distribution – shooting on a bright sunny day can be more challenging in terms of nailing the right amount of exposure.
Use telephoto lenses to zoom in on details that are not within easy reach – the pigeon/martin hole in the gable, cupolas or vents, any interesting joinery, areas where you think there may be water damage or earlier repairs.
If possible, organize and label the photos soon after you have taken them so that it is easier in the future to know the context of each image, or even better keep a notebook while you are taking the photos to record the image number and describe where and what you are recording
Play with your depth-of-field by adjusting the aperture setting. For overall shots use a small aperture in order to maximize the amount of subject matter that is in focus, but if you are shooting for instance an inner bent and wish to distinguish it more clearly from the bent beyond it, open up the aperture and focus only on the bent of interest – hopefully the other one behind will now a bit out of focus and it will be easier to distinguish what components are part of which bent. You may need to increase your ISO setting with smaller aperture settings due to the more limited amount of light reaching the camera’s sensor (or film).
I tend to not use the flash unless I’m really stuck with very low light levels since my flash does not project that far so what is illuminated can be quite limited. It can be ok for details that are more accessible. But using the flash may be of benefit in some cases since it can help to visually separate a closer layer of timbers from one further away, such as in the case of the two bents described above in the depth-of-field trick.
Make sure you are shooting what you want to record in focus!
And for sure, have some fun taking more artful shots too rather than only documentary ones. Consider shooting the exterior at twilight with lighting turned on inside the barn – make sure to set your camera up on a tripod or similar to enable the required long exposure times and keep the ISO setting fairly low to avoid a grainy image.


Night photos by friend and professional photographer Lorne Bridgman, 2010/2011.
Get the barn’s owners or family members or farm animals into some of the photos. Capture the exterior with dark clouds of a coming storm in the background. Shoot the exterior of a foggy day … or the interior when the fog has moved inside….

And don’t forget to take a selfie so that someone a hundred and fifty years from now knows who the photographer was ? !
Loving the inclusion of the view from the farm house. A very special way to capture the feeling of the farm. For anyone wanting to document a barn what is your best guidance on how to approach the owner?
If you are wanting to document someone else’s barn you definitely want and need their permission. Make sure they know exactly what you are going to use the information for and who will be able to access it. A written document describing this as an agreement is always a good idea. And make sure that all personal private information is not shared, including the address. This will be one of our highest priorities when we build our new barn directory.